Posts

Showing posts from 2017

Editing Your LightShow Pi .cfg File for Your customPlaylist

The default .cfg file points to a sample .playlist , if you want to play other music from a playlist you'll need to create a playlist and change the .cfg file. I'm assuming the following: You have a functioning LightShow Pi installation  You can transfer files to your RPi  or You can SSH to your RPi You have created a custom playlist  NOTE: It is recommended that you copy the defaults.cfg file and rename it overrides.cfg before applying any customization to your setup. After copying the file and renaming it overrides.cfg Open in text editor  Scroll down to the 'playlist' section. It's around line 235 - 240. Find the 'playlist_path =' entry and edit it to point to your custom playlist file playlist_path = $SYNCHRONIZED_LIGHTS_HOME/music/christmas/xmas/.playlist  Save your changes. It should apply the settings right away, but if you're also running webGUI, or you're in the middle of a song, you can try the following:: Stop the ...
Creating a Playlist for your LightShowPi (easy mode)

The default documentation says to create a .playlist file, and edit the file to contain one song per line in the following format: Song Name 1 [Tab] /Path/to/your/music/file Well, since it's Christmas I'd like to have a playlist with 50+ songs which can be very time consuming to create. What I found digging through the LSP files was that under the /tools/ folder there's a .py script to automate the process, and it works great. I'm assuming the following: You have a functioning RPi Your RPi is on your home network and you know its IP address You have a functioning LightShow Pi installation  You can transfer files to your RPi To automate the .playlist creation process: Copy all your music to a folder on your Pi.  I have a folder for every CD I copy over under /home/pi/lightshowpi/music/christmas/    OPTIONAL: Remove spaces from filenames  Open up a terminal Browse to your folder containing the music $ cd /home/pi/lightshowpi/music/christmas...

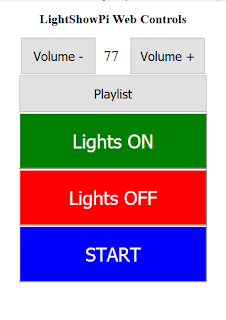
Control Your LightShow Pi With the WebGUI

Image
By Default, the webGUI is not started on a LightShow Pi installation. It is super simple and very useful to enable the webGUI. I'm assuming the following: You have a functioning RPi Your RPi is on your home network and you know its IP address You have a functioning LightShow Pi installation  To enable the webGUI: Open up a terminal session Browse to /home/pi/lightshowpi/ $ cd /home/pi/lightshowpi/ Enable the webGUI $ start_microweb That's it! Now, if you're connected to the same network as your RPi, you can open up a browser and go to http://<Pi IP Address>  to control your LightShow Pi. Here's what mine looks like: Update: I didn't have to do step 2. I was able to start_microweb from the default terminal session path.

Enable SSH and RDP on your Rasberry Pi

By far the easiest way to work with a Rasberry Pi is through SSH. The easiest way to transfer files to your Pi is to enable RDP (Remote Desktop Protocol) I'm assuming you have the following: Working Rasberry Pi Keyboard, Monitor, and Mouse connected to the RPi Rasberry Pi connected to your home network To enable SSH: Open up a Terminal Session and enter: $ sudo raspi-config Select Interfacing Options Select SSH Enable > Yes To connect to your RPi through SSH I'd recommend Putty (http://www.putty.org/) To transfer files to your RPi, I find its really easy to copy/paste through a Remote Desktop session. To enable RDP: Open up a Terminal Session and enter: $ sudo apt-get install xrdp   Now you should be able to SSH into your RPi, and have a terminal session going or Remoted Desktop to your Pi from a Windows machine to copy/paste files over your network.